Thursday, October 29, 2009

To Be Continued...And: Agua!

...We haven't disappeared again. We swear. We just have been working on so many projects that we haven't had time to finish any in particular, let alone post about them.

But here are some teaser photos:

Some are old, some are new, some are currently a total disaster. Either way, we're working on it. And when we have something a little more substantial to share, we promise that we will...We're thinking November 1st might be a good day...

Emphasis on might.

Oh! Also! While you wait-- with baited breath, I'm sure-- you can check out this super-duper great etsy shop filled with other people's projects...that are much less self-serving than ours:

It's called "Water4Christmas" and it is raising money to build clean-water wells in Africa. More than four thousand children die every day due to a lack of clean water, and a group of crafty ladies have donated their time and art to raise money for this cause, so go and take a look!

Plus, their stuff is craaaaazy cute.

Sunday, October 4, 2009

The Re-ReBirth of a Coffee Table

Before Mary headed off to Peru, I created a list of all of the projects that I had been meaning to do (and some that I hadn't) so that I wouldn't get bored without her.

This project here is a coffee table that Mary found on Big Trash Pick-up Day when she was 16. It's been with her through high school, college and married life and it was time to give it a makeover.

As usual, I forgot to take a "Before" picture. In the picture below, though, you can mostly see the old finish-- if you don't pay attention to where I had already begun removing the finish with stripper and a scraper. The table had a lot of problems, but here's a map of its most notable landmarks:


And that worked for a while- to get the main stuff off- but I eventually had to switch to the electric sander to make it a really clean finish. Then I used sandpaper on the edges and the little grooves where the sander couldn't reach.

And from all of that hard work came this guy:


Then I tried putting on a Medium stain, which came out SUPER light, so I switched to a Dark Oak color and the results were this (sorry for the blurriness. I was using a broken camera):
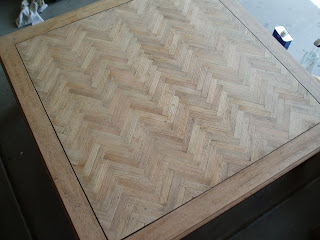
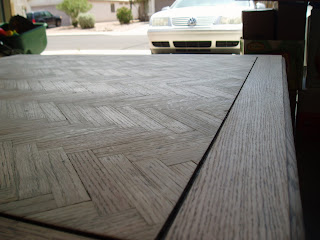
The final step was applying a spar urethane finish to protect it from UV rays and water.

You can see how pretty it looks in our living room:
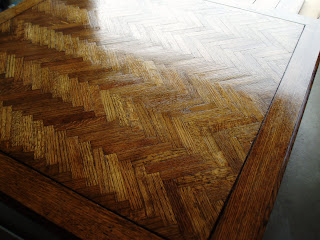
I also gave the legs and underside a rub-down with some stain to cover up any nicks and scratches. The color did end up still being lighter than it was originally, so it's like having a slightly brand new table.

Slightly.

Saturday, September 26, 2009

On Tap

Sorry it has been so long since a Michael Update. Mary and I actually brewed a beer back in July. First off, the type of beer was kind of special because what we had wanted to do was find a recipe that matched one of our favorite local beer: Kiltlifter. It's a Scottish Ale that we often get at Four Peaks Brewery.

Secondly, this was gong to be our first time kegging! Our good friend, Matt, recently moved away and, before he left, he passed down his very nice set of kegging equipment, including keg-erator.


We found a recipe at out local brew store, The Brewer's Connection, that was supposed to be very similar to Kiltlifter called "Plaid Skirt Scottish Ale."
So we bought supplies for that and prepped our brewing station. Set-up was, basically, the same but for this recipe, we needed grains and malt extracts, making it a fair amount more involved than our first beer.

Ingredients.
These were the grains. There's not really much to say about them. They just looked like grains to me.

We put the grains in this nice porous bag.

And then we added them to the brew-salted water.

(Mmmmmm.....grains.)

And, just to make Mary panic, I drained the grains by balancing the strainer precariously on the lid of the pot.

Then we added the tasty molasses.

...and of course the hops.

Then we filtered out the hops before adding the yeast and bucketing up the beer.
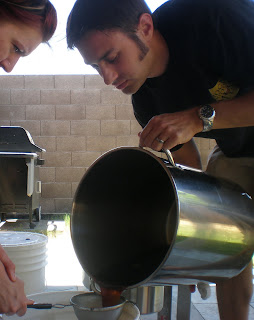
We then sealed up the bucket and let it sit in the bathtub again to turn into beer.

Which it did.

Our personal beer critic, Jeremiah, agreed that, while the beer was similar to Kiltlifter, it didn't share the same sharp aftertaste. But it was still really delicious.

Maybe even better. If you're not into "aftertaste."
And: One of the benefits of brewing with whole grains is that you can bake with the leftover grains. Here is a picture of one of the loaves of bread that I made:

Success!

Thursday, September 24, 2009

Rollin', Rollin', Rollin'...

So, something else I felt like I needed for my trip-- but, it turned out, very much did not-- was some kind of bag or cover for my Yoga mat. You see, as I was being offered free Yoga in return for my farm-handery, I figured lugging my mat all the way to South America was necessary.
It was not.
Eh. Either way, I got a Mat Roll out of it.

For the main part, I used some brown corduroy material leftover from my Inigo Montoya costume from 200...6? I had orginally planned for the thing to be just a bit longer than my mat. I rolled the mat out and eyeballed the measurements.

When my logic kicked in, however, I realized how bulky this would make it once it was rolled up and cut that son of a cow in half.

Then I simply hemmed the edges a bit and began frantically searching for something to tie it closed with.

I found nothing and so made some REALLY poorly constructed ties out of leftover stretchy headband fabric. On a day when I have the patience to not light my sewing macine on fire, I will redo the ties. Because they're crap. But the purple sure looks pretty!

Anyway, then it dawned on me that I might want a convenient way to carry the thing, and another frantic search for materials began...

This is when I delved into my favorite new resource: The Applebee's Uniform.

My current victim: the Omnipresent Apron.

(why do I even still have this uniform?)

I removed that nice, sturdy, navy blue apron string from its pouch and...

Ta-da! A handle!


And it might have been a pain-in-the-ass to cram into my backpack, but it was lovely and handy for lugging around Cusco, so it's about a 47% win.


These are apparently my favorite shorts. Apparently.

Ugmo.

We hate the way this page looks.

(...as you can see by the banner photo...)
So don't be alarmed at any and/or all strange changes you may see on here.
It's all in the name of evolution...Or mutation.
We'll see.


Update:
This was the photo:
And we're fairly happy with it for now, so please refrain from agreeing with us that it looks like hateable crap.

Thank you.

Monday, September 21, 2009

Waterbottle Sling

This is going to have to be a mini-post, because this project was done in a hasty fit of panic and no photos were taken of the process.

I realized about two days before I was to leave for Peru that I would likely need some kind of water-bottle-holding-apparatus. By this time, however, I was at the point where I refused to purchase ANYTHING ELSE and so was fashioning supplies out of whatever I could find.

After a few hours cursing at my pathetic sewing machine, I had come up with this:


The sleeve is made from some leftover quilted fabric from my housebook cover and the strap is, fantastically enough, scrapped together from my old Applebee's uniform polo shirt.

If they make you buy it, it damn well better be useful post-TequilaLimeChicken, that's all I'm sayin'.

Anyway, I doubled over the already quilted fabric so that it would be extra cushioned so I didn't end up with a Kleen Kanteen shaped bruise on my hip. Then I just wrapped it around the bottle, made note of the size (plus a little bit of give) and sewed it closed.

After that, I didn't have a strip of polo shirt that was long enough, so, instead, I just cut a bunch of large sections out, doubled them over for strength and sewed them all together, patchwork style. I attached the strap all the way to the bottom of the sling's sleeve so that it was less likely to rip apart from stress.

It's not pretty, but, man, it worked well.


Sunday, September 20, 2009

Better Late than Never...Right?


Sooo...we really didn't intend for it to be this long. We have been doing projects and documenting them and...not posting them. Oops. Mike was supposed to blog while Mary was in Peru, but he didn't. Although he did refinish 3 pieces of furniture, make 2 mirrors and complete countless other unexpected chores. So we will forgive him.

Anyway, we will be playing a little catch-up now. Here's something fun we did in July:

We tie-dyed!

Mary pretended that it was because we had a lot of stained white clothing that we didn't want to go to waste. So it was a practical project. But, really, it just sounded like fun. Like summer camp or something.

First, we chose our colors and got our materials together. We considered the natural way, with fruits and vegetables...but we weren't in the mood to learn something new.


Each dye bath required 2 gallons of boiled water for each package of color.

And, for the all-important "ties", we cut some strips from one of Mike's old college bedsheets.


After dissolving the powdered dyes according to the package instructions, we added them to the tubs...


(Whew! Look at that beautiful Arizona lawn!)


...and prepared our linen victims (the post-it's you see are our predecided color schemes for each garment. We're big nerds.).


We tied our designs...Mike being very careful and specific about his, Mary--not so much.


And let them soak for about 10 minutes in each color.


Then we rinsed them...


...and soaked up the extra color with an old towel...


...And hung those suckers up to dry!


We also tried a technique involving salt to make designs that Mary had learned in a costume design class...that apparently only works on delicate fabrics. Failure.


And look how nice the ties turned out! Ha!


Hooray for projects that make you feel 10 years old again! As should they all!


Friday, July 3, 2009

Beer Brewing & Bottling

About two years ago Mary had been nice enough to get me a gift certificate to a brewing store for our anniversary and it only took me until about a month and a half ago to actually brew my own beer. For my first beer I decided to go with the easiest recipe I could to cut back on the possibilities of me screwing it up. The beer I chose to make was the Dry Heat Wheat from our local home brew store. (http://www.brewersconnection.com/recipes/DryHeatWheat.htm)

Sorry for so few photos. Mary was busy with finals and was unable to help me brew and take photos. I promise a better collection on the next beer brewing excursion.

The first thing I had to do before I even started was to clean and disinfect all of my beer brewing material.

Once I finally got everything clean enough to eat off of it was time to start boiling the water with the wheat malt and hops.

Once I finished with all of my boiling I dumped everything in a bucket and stuck it in the bathtub for about 4 days. After the 4 days I transferred the beer from the bucket into a big glass carboy but not without creating a huge mess. I learned all the wonders of siphoning beer.

After another 4 days it was time to bottle the beer. In order to clean all of my bottles I employed the use of our handy bottle washing machine.


Look how pretty they look.

Here's the big glass carboy full of beer right before it went into all of those shiny clean bottles.


After a more successful bout of siphoning and then capping I had all of my beer bottled.

After another week of waiting we were able to break into the first bottle. It was kind of wheaty and fruity (banana-ey?) and over all pretty good for a first shot.

Friday, June 19, 2009

The Smelly Kids.


I'm so very glad this is the first post since husband has made our weblog public (well, public-er). Because it's about our armpits.

Since I was 6 (yeah, 6. Oh, genetics) I have tried just about every deodorant and deodorant alternative ever invented. Nothing has ever been deemed foolproof and plenty have just straight up failed. Since I suddenly give a damn about poisoning my body, the past couple of years I have been experimenting with those natural deodorants...Most didn't work and one burnt my skin like acid. Which was way fun. Then Mike noticed that one of his shirts had been dyed hot pink by his deodorant and he started to get nervous too.

So when I found this homemade deodorant recipe from angrychicken (with whom I am obsessed) I figured what the hell...can't hurt to try.

All it really took was cornstarch, baking soda (which I had on hand), shea butter, cocoa butter, vitamin E oil and the essential oil of my choice (I chose Clove Bud--because it's "motivating").

(Don't you think I maybe have a future career in gelcap photography?)

...A woman I work with told me that she thinks I have great time management skills, since I have time to make my own deodorant. A) she obviously doesn't know me that well B) I was supposed to be doing something more important and C) this seriously took me 5 minutes of actual work. I microwaved, stirred and refrigerated. That's it.

I chose poorly as far as my receptacle. I would pick a wider, shallower jar next time. We really have to dig at this one.

But yeah, we just use about a pea sized amount, as recommended by the originator, on each side and, seriously, we've been using it for about 4 weeks now and one application leaves us both stink-free all day long. In the desert, no less. We still sweat, obviously, but that's kind of an important bodily function. And I sweat like a freak regardless, so I don't really notice a difference.


I should have added a whole lot more Clove Bud oil, though, since the cocoa butter is REALLY cocoa-ey and we just kind of smell like chocolate all of the time. Sweaty, sweaty chocolate.

p.s. we're aware that our page design clashes. we're also, for the moment, having trouble caring. :)